How to Migrate to Google Analytics 4
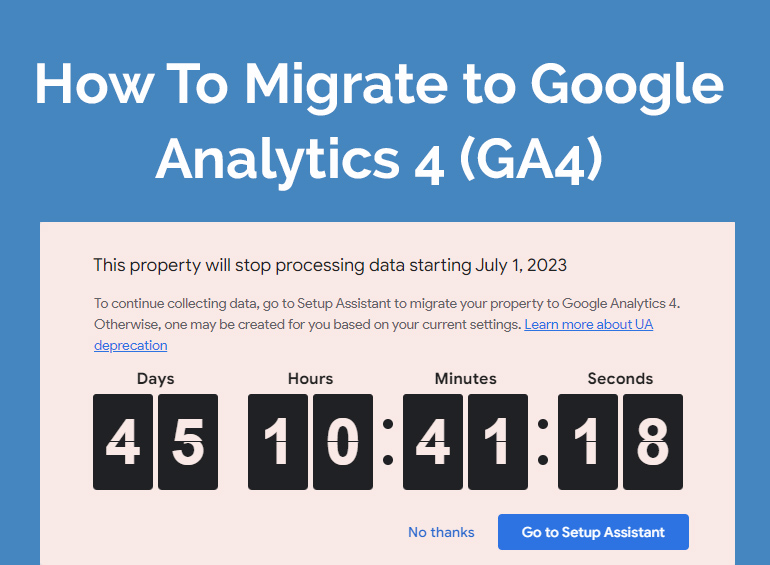
With only 45 days left until Google sunsets Universal Analytics the clock is ticking to migrate to the new Google Analytics 4.
You might have logged into analytics and seen a pop-up like the one above with a count down timer.
Why should you move to Google Analytics 4?
If tracking how customers interreact with your website, running Google Ads and SEO campaigns are important to you, then you don’t have much of an option as the previous UA (Universal Analytics) will no longer track data after the 1st of July 2023.
Step 1 – Setup a Basic GA4 Property:
I run a digital agency and this is the straight forward process that we use. The first step is to login to https://analytics.google.com.
When the countdown timer appears, click on “Go to Setup assistant”:

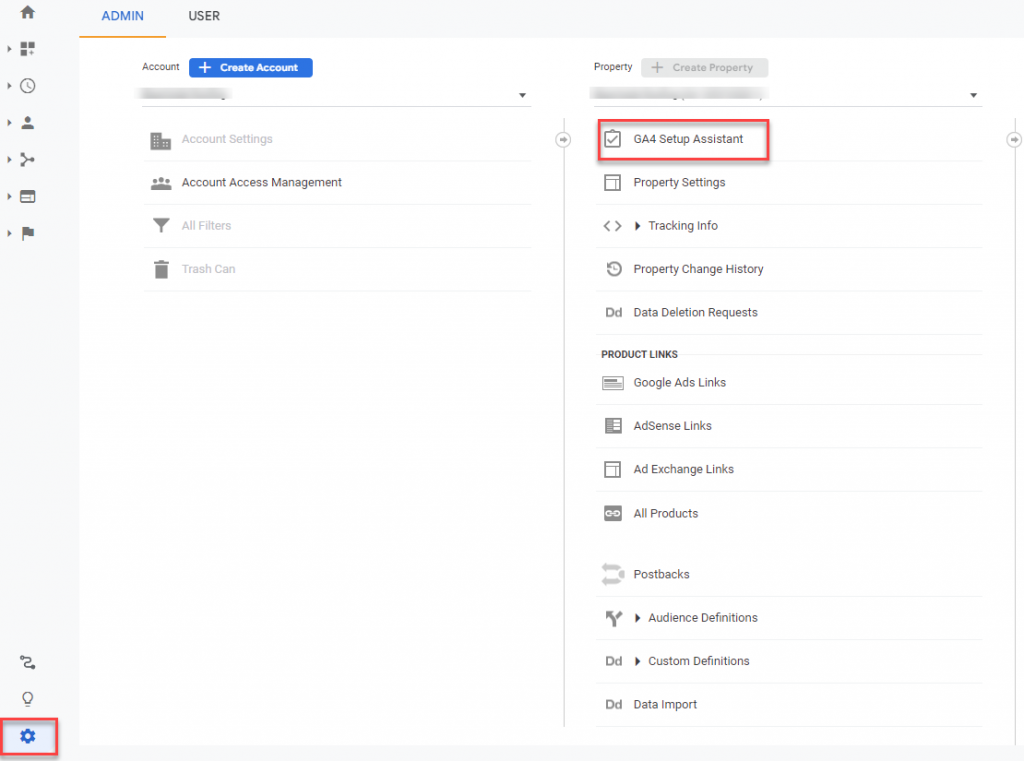
If you don’t get the pop-up, then click settings in the bottom left of your Analytics account, and then “GA4 Setup Assistant”.
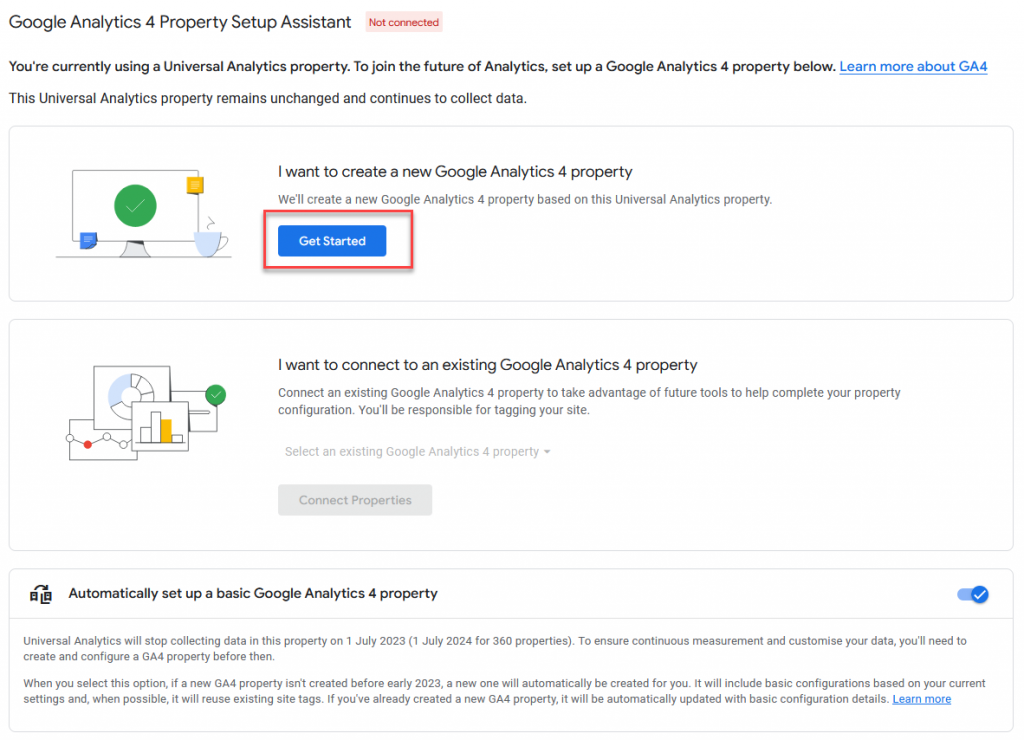
Next, click on “Get Started” under “I want to create a new Google Analytics 4 property”.
Note: Google may have automatically created a basic GA4 property, if so you will get a different screen, proceed to the next steps.
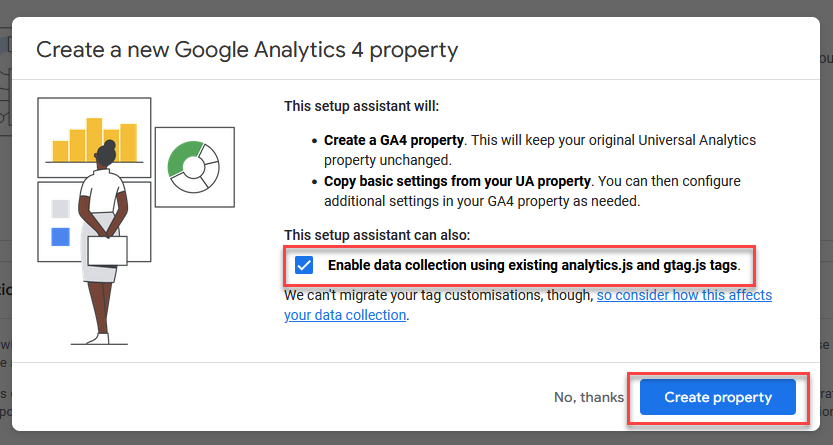
Make sure data collection is enabled and click “Create Property”.
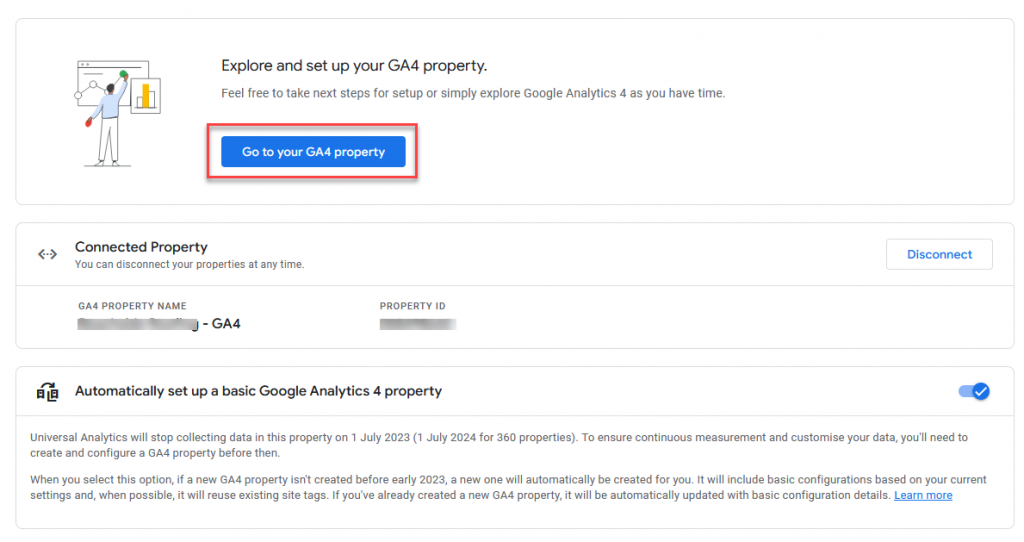
If successful you should see a screen like below that shows your new connected property and an button to navigate to the new property. Click on “Go to your GA4 Property”.
Congratulations, you now have the basic GA4 property created, now to set it up.
Step 2: Viewing the setup assistant tasks and checking that data collection is working.
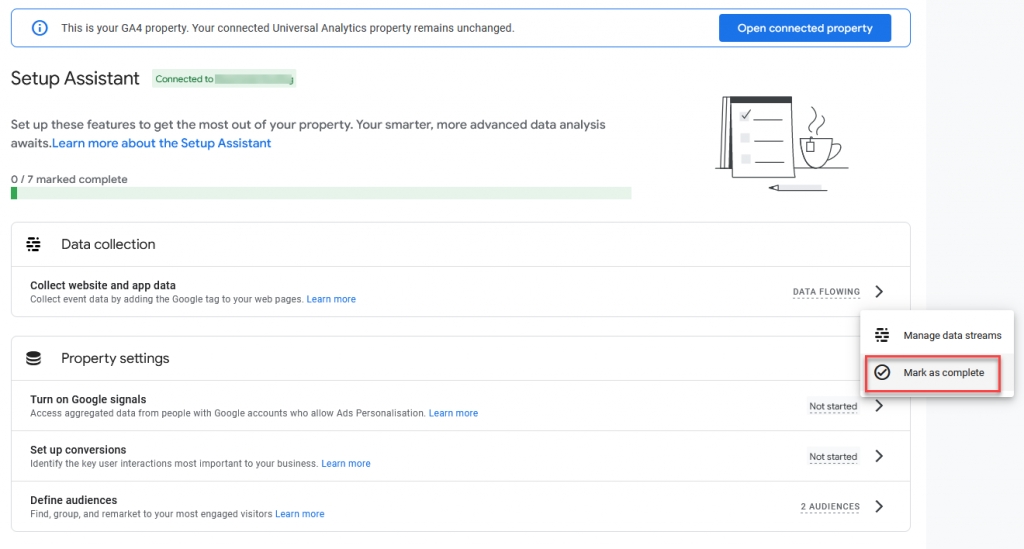
Once in your new property, Google will bring up your “Setup Assistant”. Below you can see a 0/7 items marked as completed.
We will now go through each one and set them up.
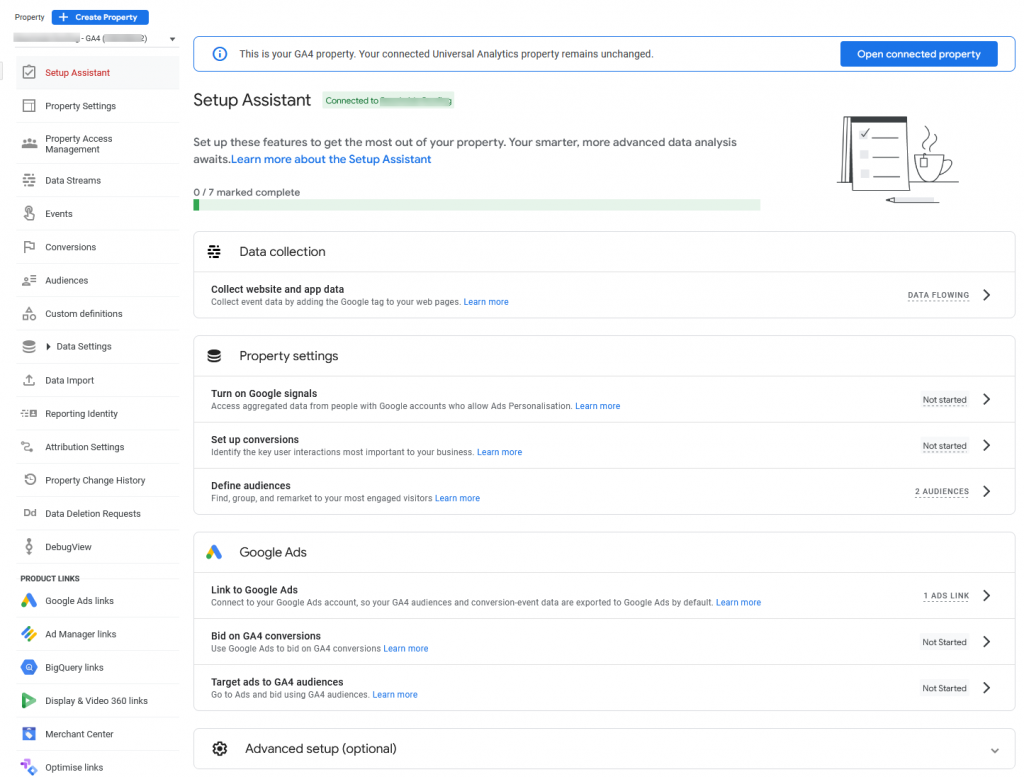
Item 1/7 Data Collection:
Your new GA4 property might show “Data Flowing” or “Not Started”. According to Google the UA tracking code should still work with GA4, however I could not find any information from Google regarding the differences between the two tracking codes in their documentation: https://support.google.com/analytics/answer/9964640?hl=en#zippy=%2Cin-this-article
My recommendation is to use the new GA4 tracking code to future proof your analytics.
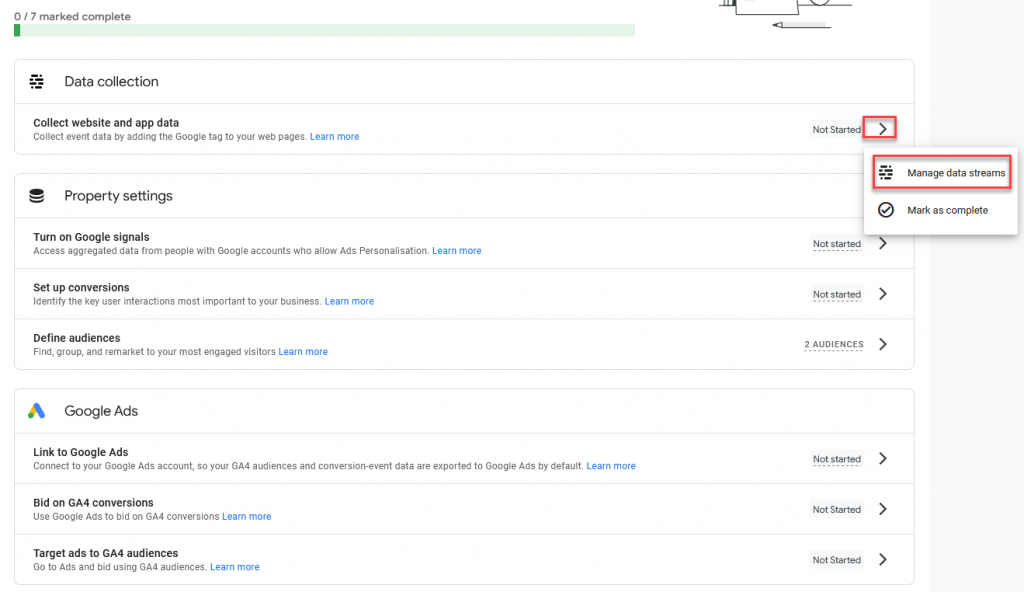
Click on the arrow next to “Data Collection” and then “Manage Data Streams”:
Next you will see a list of your data streams, most websites should only have one. Click on your stream to bring up the tracking info:
Even though we can see data is flowing, it shows 0 connected site tags at the bottom.
Click on “Configure Tag Settings:
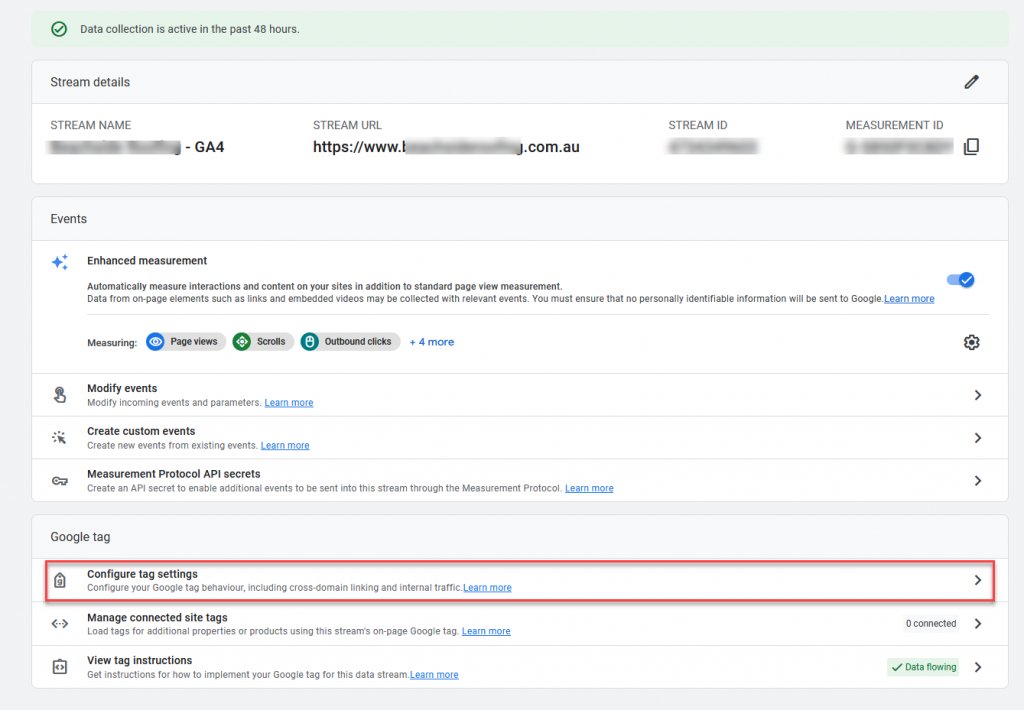
On this screen we can see Analytics is not happy with with the current tracking, sometimes it can take 30 mins from when a new GA4 property is created to see a data flow.
Lets continue the code setup by clicking on “Installation Instructions”:
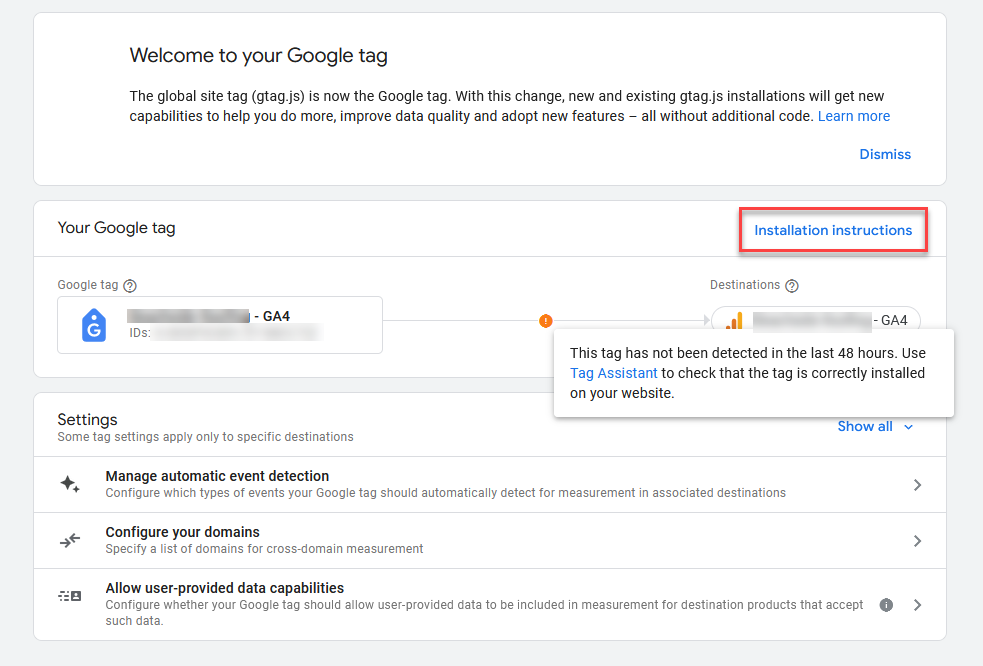
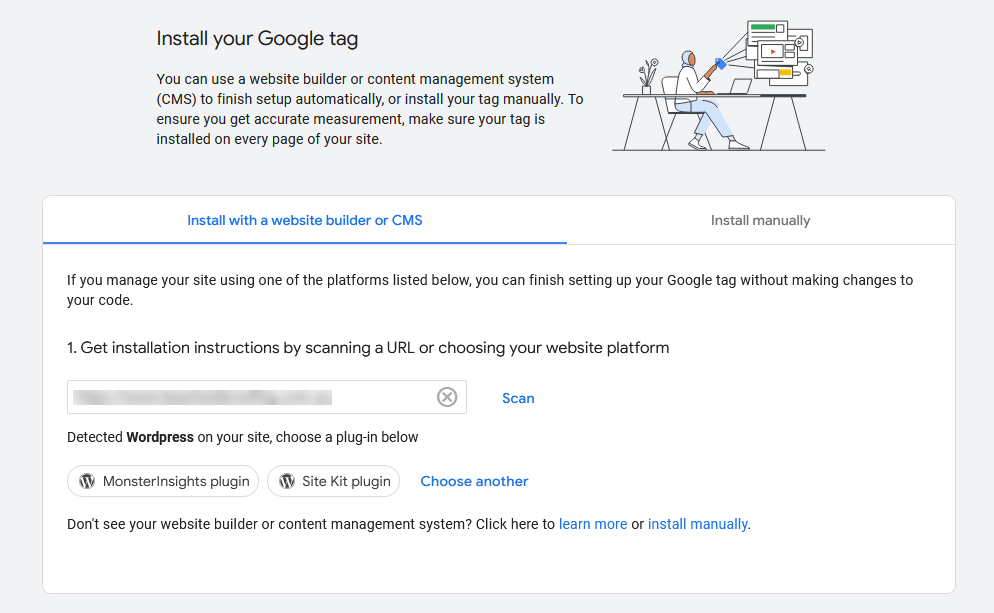
Googles Tag installation provides multiple options depending on what website you have, for this demo I am going to install a manual tag on a WordPress website as approximately 65% of websites in Australia use WordPress as their chosen Content Management System.
Click on “Install Manually”, you will then see your unique tracking code. Click the copy icon next to it.
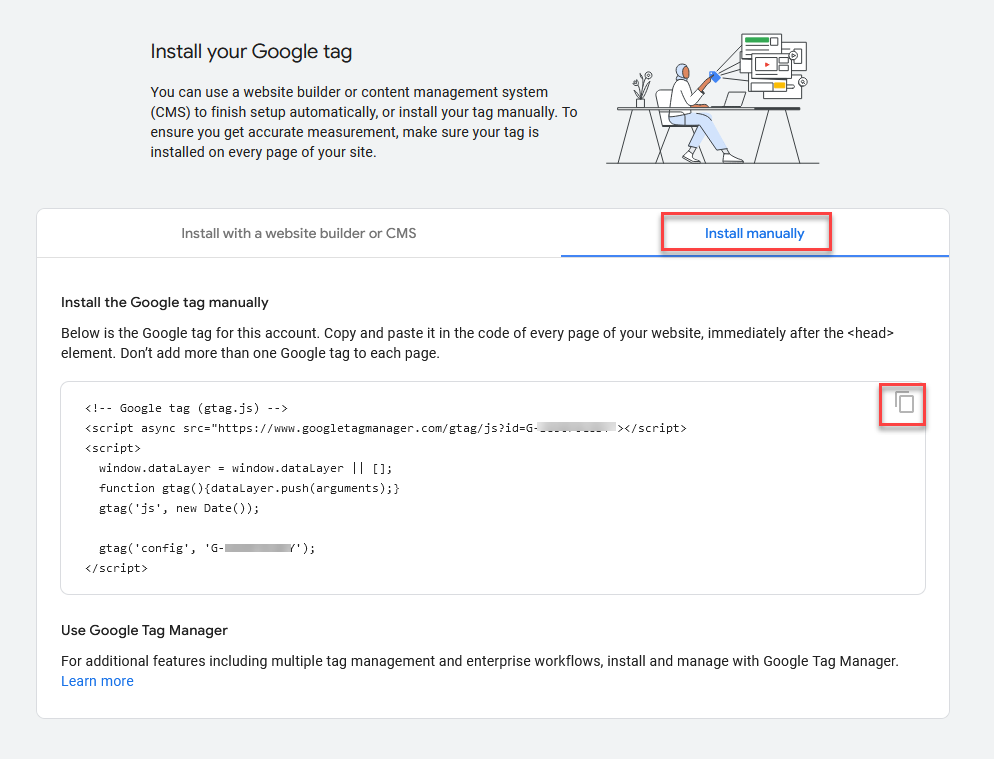
If you use a WordPress website, your theme may include a place to add your new tracking code. Otherwise you can use a plugin such as Insert Headers And Footers although if you have previous version of Google Analytics, you should have a tracking code already placed on your website.

Once you have placed your tracking code, be sure to clear any cache systems.
If you want to manually validate that your code is loading, open your website in an incognito window, press “Ctrl + U” to view your websites page source. (Option+Command+U on a Mac).
On the tracking code you pasted, take note of your unique ID on either the second line or second last line.
<!– Google tag (gtag.js) –>
<script async src=”https://www.googletagmanager.com/gtag/js?id=G-XXXXXXXX“></script>
<script>
window.dataLayer = window.dataLayer || [];
function gtag(){dataLayer.push(arguments);}
gtag(‘js’, new Date());
gtag(‘config’, ‘G-XXXXXXXX‘);
</script>
While viewing the page source, use the find function (Crtl + F) to search for your unique ID code G-XXXXXXXX‘. If you can find your ID and your tracking code is showing in the source then great work on placing the tracking code.
Another way to double check your Google Analytics 4 tracking is with live tracking, close all the setup windows and navigate to reports. GA4 should show live users.
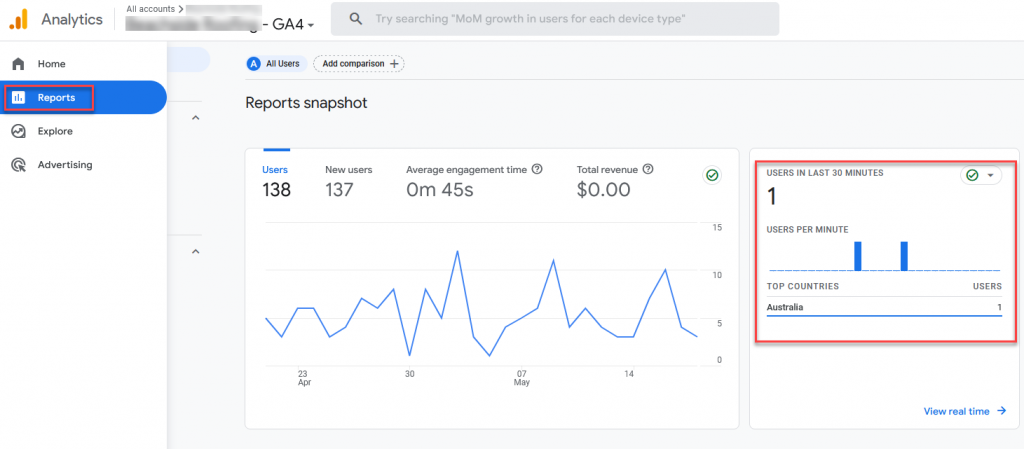
You can now return to the Setup Assistant screen and mark Data Collection as Complete.
Item 2/7 Turn on Google Signals:
The next item the setup assistant list below Data Collection is Google Signals.
Google Signals in GA4 is a new feature that collects data to help you understand how users interact with your website or app across multiple devices they might use.
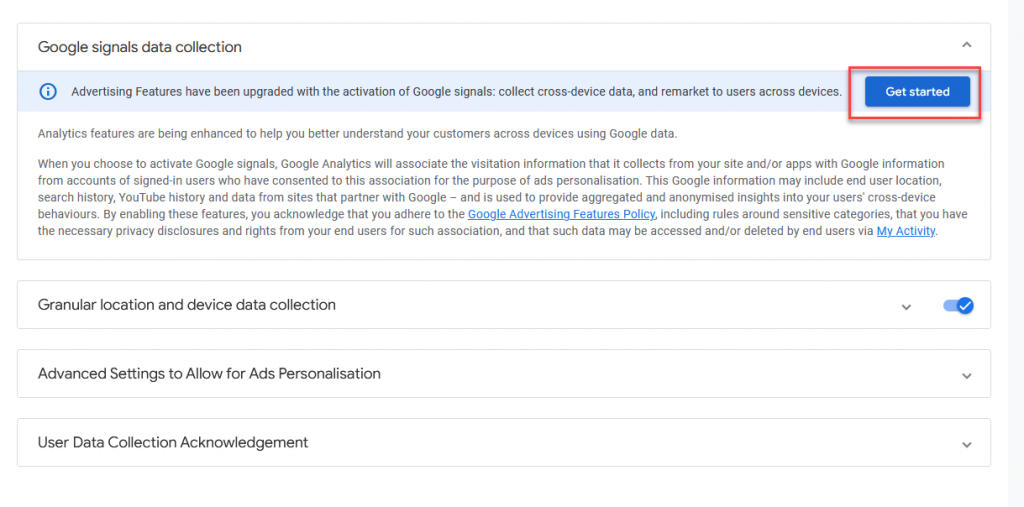
It’s quick and easy to setup, On Googles GA4 setup assistant screen, Click the arrow and then “Manage Google Signals”.
On the Google signals data collection screen, click “Get Started”
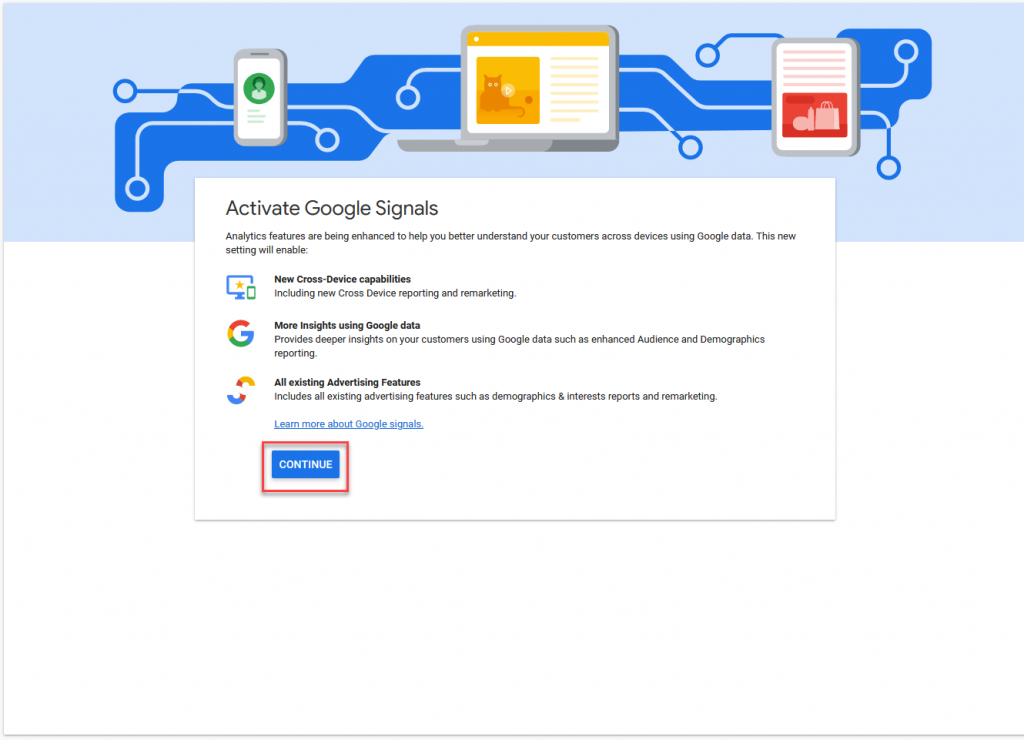
Click “Continue”, then “Activate”:
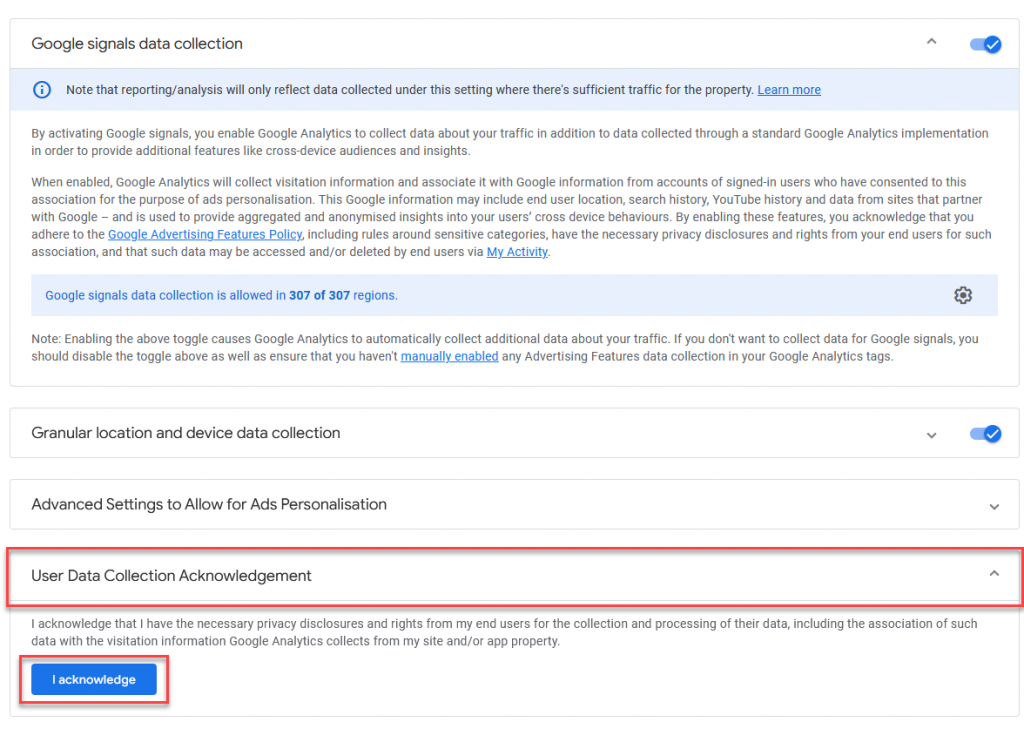
You will be returned to the Google Signals screen, the last step is the “User Data Collection Acknowledgement”.
Click on it, then click “I acknowledge”
Return to the Setup Assistant, we are now up to 2 out of 7.
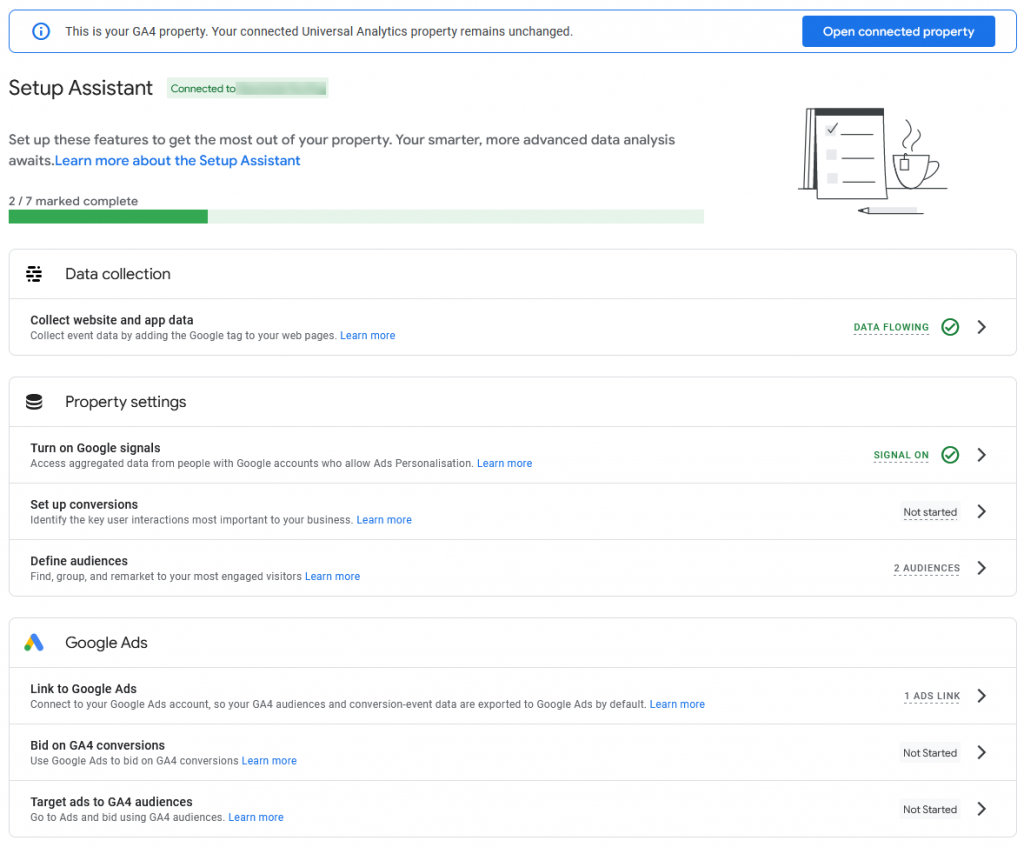
Item 3 – Set up Conversions
Conversions are one of the most important metrics in online marketing, it enables you to measure how many leads or sales you have generated from a marketing campaign.
If you were using conversions in your old Analytics account, the import is very easy.
Click the arrow on “Setup Conversions” and then “Import from Universal Analytics”
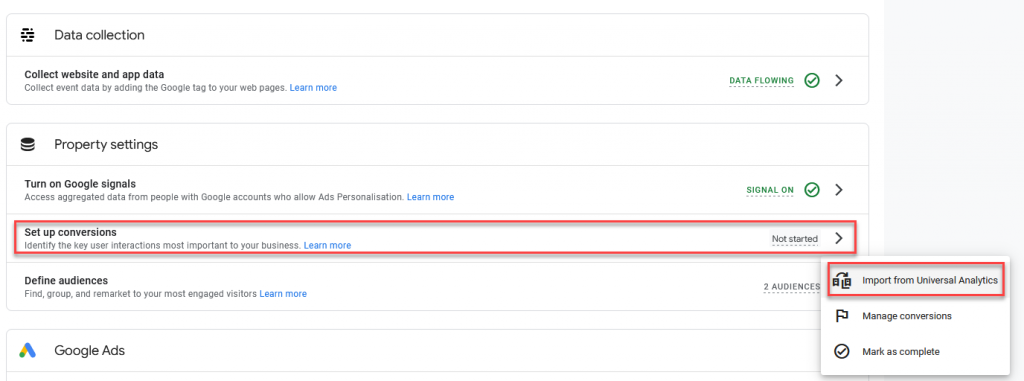
Next we can see the previous conversions/goals that were being recorded in your Universal Analytics.
Every website will have different conversions they track, some accounts have one, some accounts have 10.
Select the conversions that you would like to import into Google Analytics 4 and click “Import Selected”.
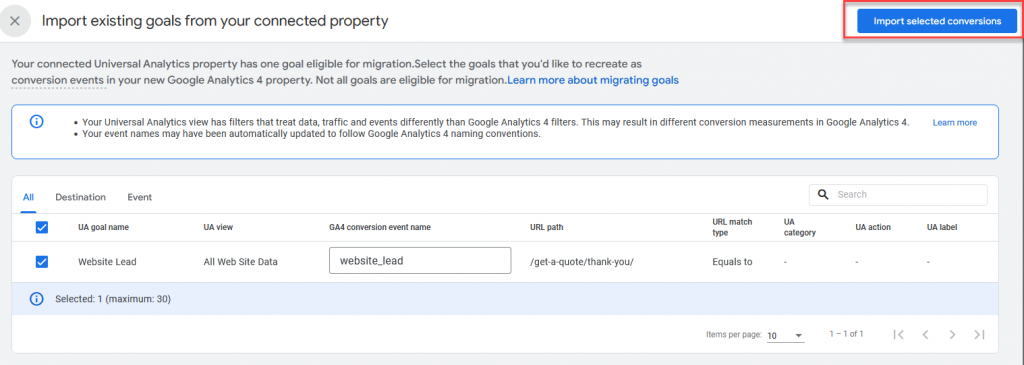
Item 3 is now completed.
If you no conversions to import, and would like to track conversions, please see Google’s guide: https://support.google.com/analytics/answer/12966437?hl=en
Item 4 – Define Audiences
Chances are you might already have audiences defined in your Universal Analytics, and they may have been brought across when your Google Analytics account was created.
Google Analytics 4 audiences are users who visit your website or your app and that you group based on almost any behavior that matters to you. They’re used to better understand a specific group of users or market to them.
https://measureschool.com/google-analytics-4-audiences/
First, lets check which audiences are are in your new Google Analytics 4 property. Click the arrow and then “Manage Audiences”.
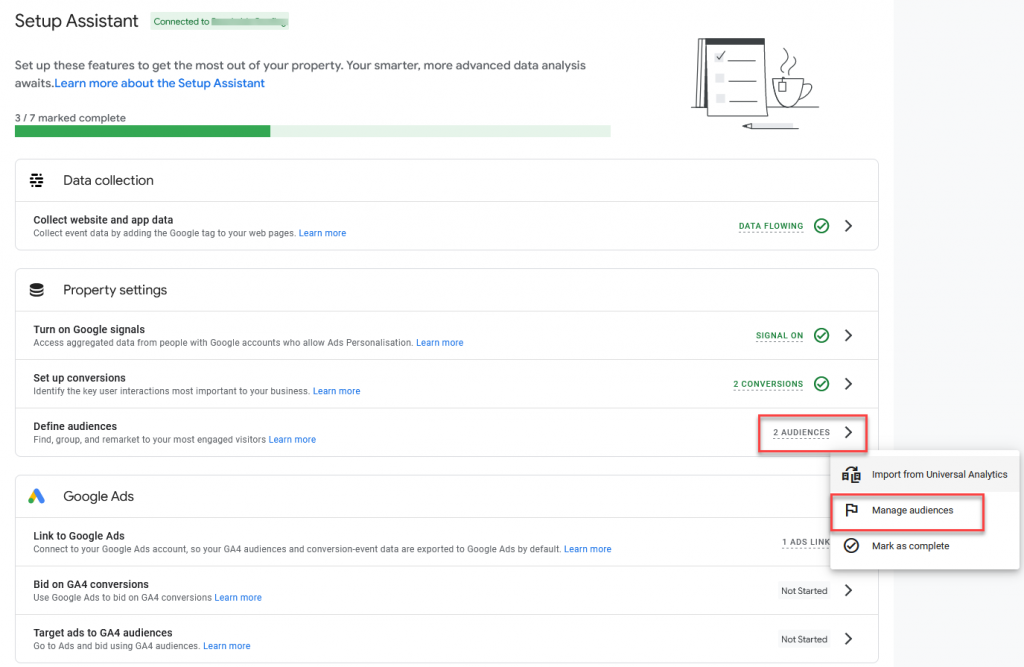
Looking at this account there are two default audiences, all users and users who have made a purchase.
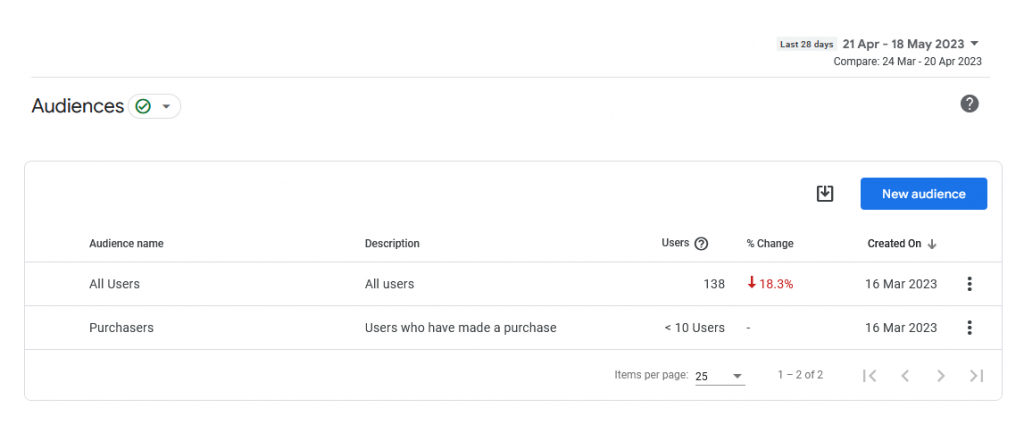
If you are happy with these two audiences, then we can go ahead and mark audiences as complete.
To check which Audiences you have in your old Universal Analytics account, navigate to the old property, Click “Audience” and then “Audiences”.
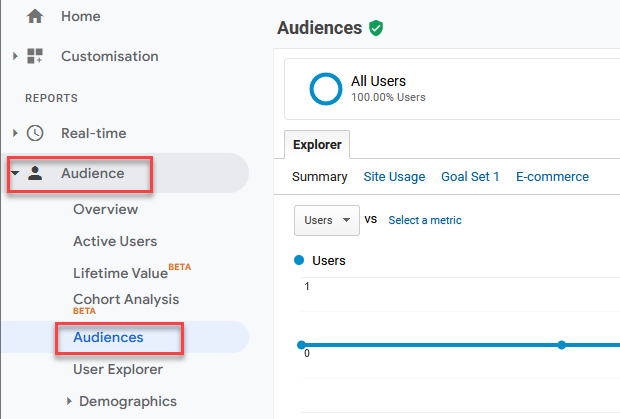
If you see a list of Audiences here that are not in your new Google Analytics 4 property, and wish to move them across, its a bit of a process that involves exporting them to a Google Sheets and using Google’s GA4 Migrator for Google Analytics Google Sheets add-on.
Further Info:
Googles guide on [UA→GA4] Recreate Universal Analytics audiences:
https://support.google.com/analytics/answer/12366001?hl=en-GB&utm_id=ad
GA4 Migrator for Google Analytics Google Sheets add-on:
https://workspace.google.com/marketplace/app/ga4_migrator_for_google_analytics/472716783070
Item 5 – Link to Google Ads
If you had a previous Google Ads account link then the link should have carried across, let’s double check the account link information.
Click the arrow next to “Link to Google Ads” then “Manage Google Ads links”.
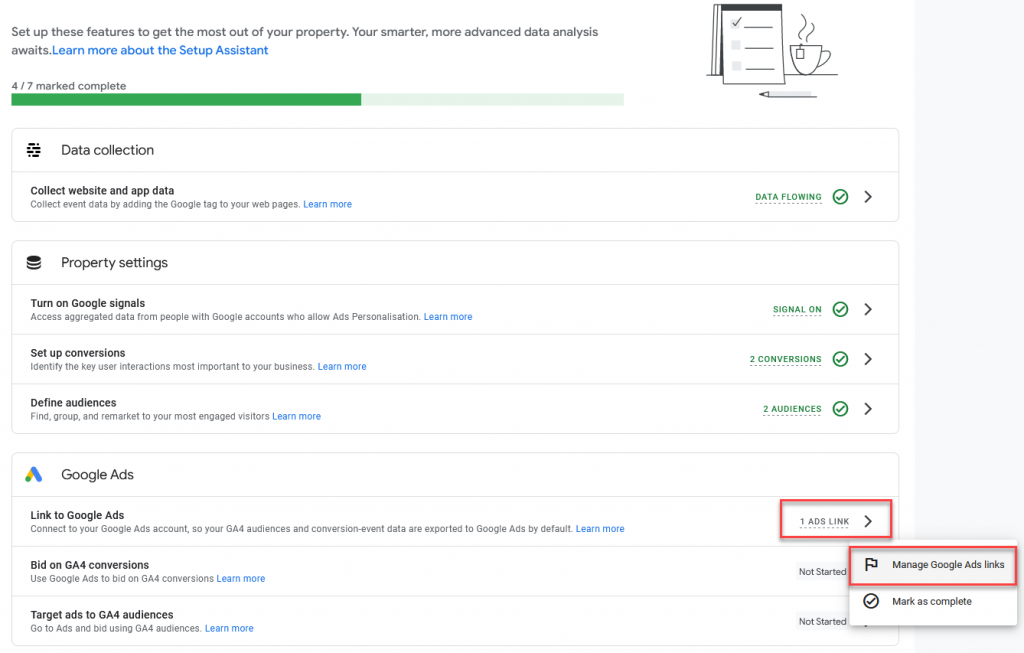
You should see a list of linked Google Ad Accounts, most small businesses advertising on Google should only have one account.
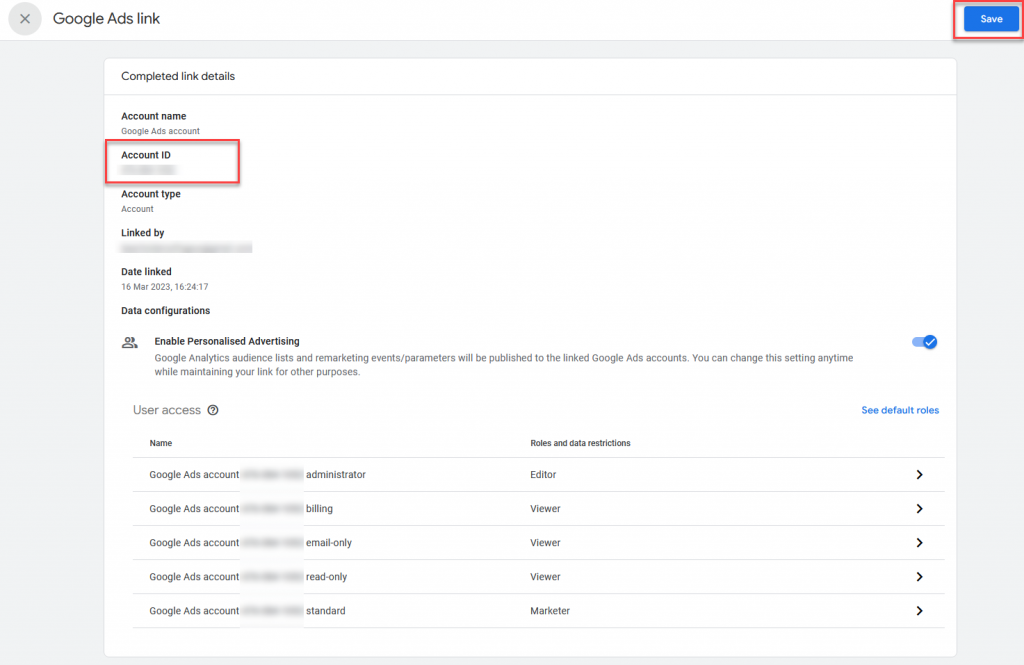
Click the arrow to view the account linking information.

Check that the account ID is correct and the same account you are advertising with, if so click save and we can now mark this as complete.
Items 6 & 7:
Google last two steps are:
- Bid on GA4 conversions
- Target ads to GA4 audiences
I am not in a position to recommend whether this is something you should do, as depending your marketing and Google Ads strategy this can have an impact of your performance.
Google prefers customers to run automated Ad campaigns, some marketers prefer to retain manual control over bidding.
As an example some ad campaigns can provide better returns or a better cost per conversion when not bidding on automated conversions, so there is no right or wrong answer, its on a case by case basis.
If you do want to set these up, here are Google’s guides below:
Bid on GA4 conversions: https://support.google.com/analytics/answer/10110290?hl=en_GB&utm_id=ad#bid-on-conversions&zippy=%2Cbid-on-ga-conversions
Target ads to GA4 audiences: https://support.google.com/analytics/answer/10110290?hl=en-GB&utm_id=ad#target-audiences&zippy=%2Ctarget-ads-to-ga-audiences
Summary:
Congratulations, you have just completed your Google Analytics 4 migration. I hope you found our tutorial helpful and look forward to all the new advantages of Google Analytics 4.
Need help with an existing or new Website? Complete the below form to discuss your project and get a free quote from your local Australian website designer.
